OK, this post has nothing to do with food, but a couple of moms I know asked me about cloth diapers and folding prefolds and such. So I'm going to post a few posts on diapers and how we folded our flats and prefolds.
I'm also shameless and get to post pictures of my babies.
When I started cloth my oldest girl was 17 months old. DH told me to get a few of each type and see what I liked from there. So I did. I got wool, fleece, pockets, fitteds, prefolds, all in ones. Tried them all... and Diva potty learned at 20 months. Niiicee. But it was prefect prep for Piglet who was on her way.
Prefolds. I love prefolds. Even if you don't use prefolds as your main cloth diaper, they are great for doubling your absorbency in pockets and even folded on top of all in ones for night time. They are SO easy to care for too. Easy to wash, cheap, versatile. So, where do you start? Let's see, don't get those mainstream gerber ones. They aren't absorbent or soft. Try the Indian or Chinese prefolds are wonderful. I dyed some of ours for more color. The one I used on this 18 inch doll is a preemie. I bought those for stuffing pocket diapers and we used them as prefolds when the girls were newborns. When you get your prefolds they need to be prepped. Several washings will make them softer and more absorbent. Prefolds need a cover.
Flats- Like prefolds they are inexpensive and easy to care for- they dry in NO time. Flats are my favorite. I love that they are so trim. They can also be used as doublers and stuffers for pocket diapers. They are pretty much one size fits all too. Flats need covers also.
 |
| Pixie in the cutest bacon and eggs fitted. |
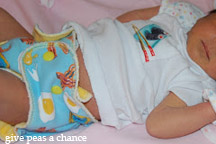
Fitteds- These are diapers with snaps or Aplix (velcro) for easy fastening. They are cut just like a diaper. So if you don't want to fold anything, fitteds are easy. You can just grab them, no need for pins or snappis. Put them on and if you're going out and about throw a cover or wool on top. Some fitteds have a soaker that is not sewn in. Sometimes they are snapped in or sewen on top. This is on of my criteria for most diapers, I want quick drying. If the soaker/absorbent part is sewen into the diaper that's more layers the dryer has to dry through and I don't feel it gets clean enough if water has to go through all those layers. See how this soaker is not sewn into the middle of the diaper? That's what I mean. I also prefer snaps. Aplix is a pain to me, it gets caught on my wool, snags fleece all sorts of issues. Fitteds need covers.
 |
| Soaker that is not inside of a diaper. Just sewn on top. |
Pockets- Pockets are diapers that have an opening so you can stuff them with the amount of absorbency you need. I used pockets at night with double the amount of soakers and didn't have issues. We have used hemp soakers, prefolds and flats to stuff our pockets. With a pocket you don't need a cover, most are lined with PUL some with fleece.
 |
| All In One |
All in ones- I'm not a huge fan. I do have some faves. I do love All in twos. They require no cover and are quick drying. The soaker on these are also on the outside. They were our go to for when we go out.
Covers- Oy, it's late. I love wool. Fleece is easy and cheap for a cover. PUL covers are nice and easy. Some can just be wiped off if soiled.
Wool- interlock, knit or crochet. Even recycled from wool sweaters. They are wonderful covers, natural and breathable.
 |
| Knit longies and skirite. |
|
|
 |
| Wool interlock. | | | |
|
|
|
Washing- When washing cloth diapers there are a ton of "rules". I wash mine with 1/3 or half the amount of detergent. I currently use Rockin' Green. Here is a great site with a ton of information I used when I first started out.
LINK.


+copy.jpg)
+copy.jpg)
+copy.jpg)
+copy.jpg)
+copy.jpg)
+copy.jpg)
+copy.jpg)
+copy.jpg)
+copy.jpg)
+copy.jpg)
+copy.jpg)
+copy.jpg)
+(1)+copy.jpg)
+copy.jpg)
+copy.jpg)
+copy.jpg)
.JPG)
+copy.jpg)
+copy.jpg)
+copy.jpg)
+copy.jpg)
+copy.jpg)
+copy.jpg)
+copy.jpg)
+copy.jpg)
+copy.jpg)
+copy.jpg)


+copy.jpg)
+copy.jpg)
 Steel cut oats for baby. I made this the same way I made the brown rice cereal for Pixie. Put the dry uncooked oats in a blender and blend it into a powder. I cooked it for 20-25 minutes with a water to powder ratio of 4 water 1 oats. Bring the water to a boil, whisk in oats, simmer and stir occasionally.
 No real recipe I just follow the directions on the can, but this is my favorite oatmeal, the McCann's. So yummy! I love it with butter, brown sugar, a splash of heavy cream and sometimes slivered almonds or pecans. I guess you could add raisins- *shudders*